|
[使用方法]ATtiny13A芯片的使用方法 |
 一派護法 十九級 |
首先,祝賀我成功地點亮了LED燈!  |
|
一派護法 十九級 |
 電路: 第1腳接正常的AVR RESET電路,和ATMega16一樣,電容10μF。 第3腳通過一個200歐姆的電阻接發光二極管的正極。 然後按照ATMega16的電路圖接上ISP下載口。 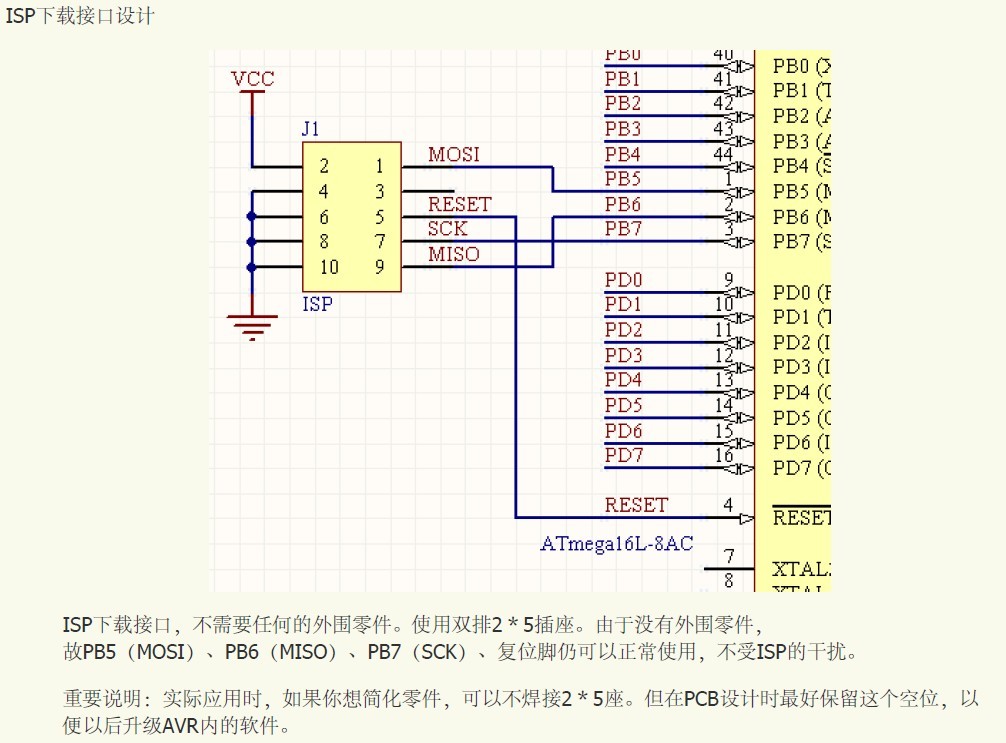
|
|
一派護法 十九級 |
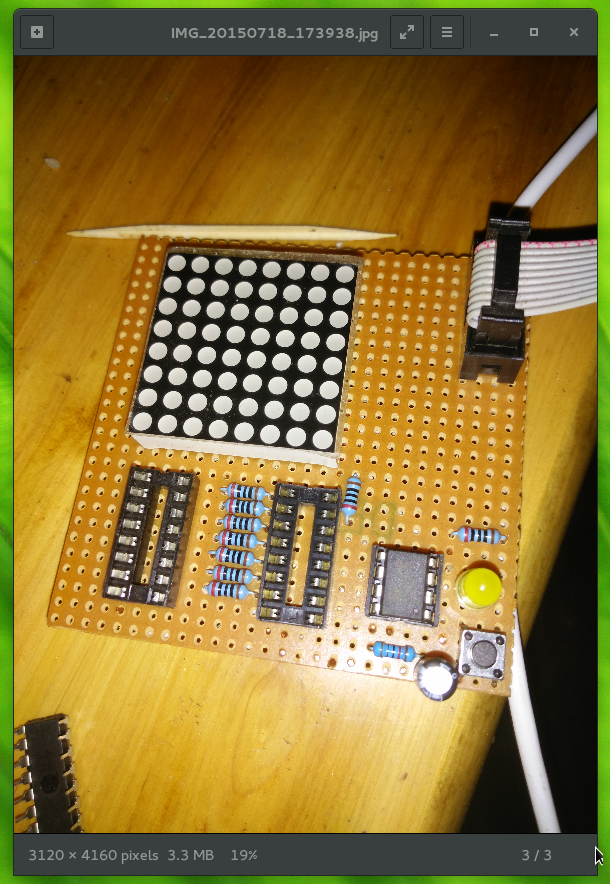 如圖,插好USBASP。圖中的兩個HC595和一個8x8LED不用管,我以前就焊好了。
|
|
一派護法 十九級 |
然後編寫一個C文件,文件名tiny.c:
#include <avr/io.h>
#include <avr/eeprom.h>
int main()
{
DDRB |= _BV(4); //把PB4設置為輸出
PORTB |= _BV(4); //把PB4設置為高電平
eeprom_busy_wait();
eeprom_write_byte(0x00, 0xa5);
eeprom_busy_wait();
eeprom_write_byte(0x01, 0xb6);
eeprom_busy_wait();
eeprom_write_byte(0x02, 0xc7);
eeprom_busy_wait();
eeprom_write_byte(0x03, PORTB);
eeprom_busy_wait();
eeprom_write_byte(0x04, DDRB);
eeprom_busy_wait();
eeprom_write_byte(0x05, PINB);
eeprom_busy_wait();
while (1);
}
為了方便起見,筆者是在Linux下用的avrdude+gccavr進行編譯的程序。在Windows平台上和WinAVR等價。用ICC AVR的話就得把頭文件改了,還要把_BV改成BIT。
|
|
一派護法 十九級 |
Makefile:
# make
tiny.hex: tiny.c
avr-gcc -mmcu=attiny13 -Wall -Os tiny.c -o tiny.o
avr-objcopy -j .text -j .data -O ihex tiny.o tiny.hex
# make run
run: tiny.hex
sudo avrdude -p t13 -c usbasp -e -U flash:w:tiny.hex
|
|
一派護法 十九級 |
在終端中執行make run(也可以先make後make run),把程序下載到芯片中。程序的運行結果是:LED亮了! 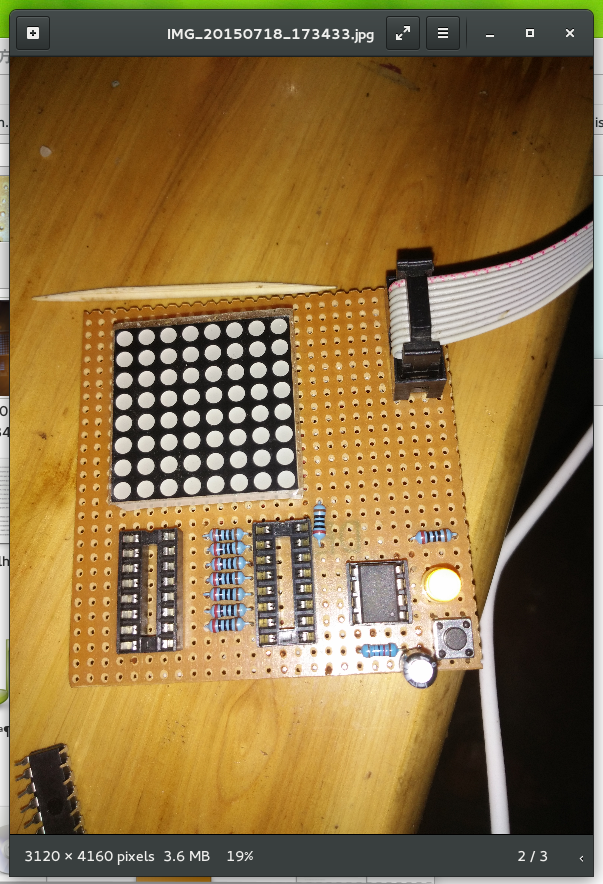 |
|
一派護法 十九級 |
同時,程序運行後獲得的EEPROM內容如下: 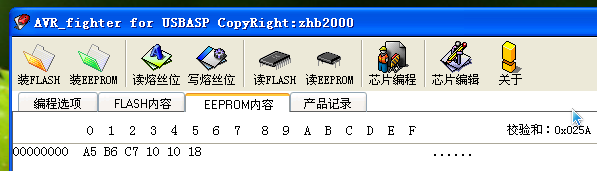 這說明, PORTB = 0x10 (00010000) DDRB = 0X10 (00010000) PINB = 0x18 (00011000) |
|
一派護法 十九級 |
PORTB = 0x10 (00010000)
左邊第一位是PB7(當然ATtiny13根本沒這個端口)
左邊第4位就是PB4,PORTB中只有這一位為1
右邊最後一位是PB0
|
|
一派護法 十九級 |
現在刪掉EEPROM部分的代碼。
#include <avr/io.h>
int main()
{
DDRB |= _BV(4); //把PB4設置為輸出
PORTB |= _BV(4); //把PB4設置為高電平
while (1);
}
程序運行結果:LED亮
#include <avr/io.h>
int main()
{
DDRB |= _BV(4); //把PB4設置為輸出
PORTB &= ~_BV(4); //把PB4設置為低電平
while (1);
}
程序運行結果:LED滅
|
|
一派護法 十九級 |
令我奇怪的是,之前不能運行的以下程序:
#include <avr/io.h>
int main()
{
DDRB = 0xff;
PORTB = 0xff;
while (1) {
PORTB = 0xff;
}
}
現在居然又能正常運行了。。。我靠!所以這個原因暫時還沒找到。。。
|
|
一派護法 十九級 |
閃爍燈程序,本人已證明該程序可以在ATtiny13A上正常運行。
#include <avr/io.h>
#define F_CPU 1000000U // 這個我是暫時亂寫的晶振大小,我也不知道現在晶振大小是多少!!!!
#include <util/delay.h>
int main()
{
DDRB = 0xff;
PORTB = 0xff;
while (1) {
PORTB = 0xff;
_delay_ms(1000);
PORTB = 0x00;
_delay_ms(1000);
}
}
|
|
一派護法 十九級 |
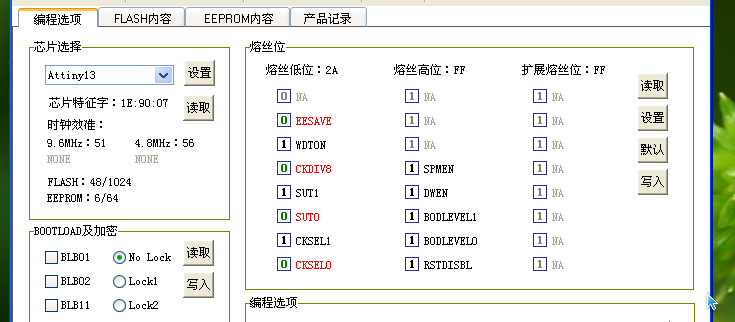 我的熔絲位被設置成了2A FF。因為CKSEL = 10,所以芯片是使用的內部的9.6 MHz晶振,又因為CKDIV8 = 0,所以晶振進行了8分頻,因為9.6÷8=1.2,所以F_CPU應該被設置為1200000U: #define F_CPU 1200000U
|
|
一派護法 十九級 |
插上一個74HC595後,用Linux下的avrdude燒寫的以下程序:
#include <avr/io.h>
#define F_CPU 1200000U
#include <util/delay.h>
int main()
{
DDRB = 0xff;
PORTB = 0xff;
while (1) {
PORTB = 0xff;
_delay_ms(500);
PORTB = 0x00;
_delay_ms(500);
}
}
可以正常運行。運行結果:LED亮0.5s滅0.5s。
但是,用AVR_frighter保存flash內容,擦除芯片,重新燒寫保存的flash內容後,程序完全不能運行,LED完全不亮。
不過,用AVR_frighter讀寫熔絲位還是可以的。
|
|
一派護法 十九級 |
這充分表明了:
我的推測1“因為ATtiny13的PB口不足8個I/O口,執行DDRB = PORTB = 0xff把全部8個I/O口都設置為1會引起程序故障而導致所有I/O口都不能輸出任何電平。必須要執行DDRB |= _BV(4)單獨設置一個I/O口為輸出,程序才能正常運行” 是 錯誤的!
我的推測2“74HC595芯片影響了AVR_frighter對ISP程序下載的操作導致程序不能正常下載,而該芯片不影響avrdude下載程序” 可能是正確的。
|
|
一派護法 十九級 |
現在通過實驗證明推測2的正確性。
在ICC AVR中編寫以下程序,並用AVR_frighter燒寫:
#include <iot13Av.h> // ATtiny13A
void main(void)
{
DDRB = 0xff;
PORTB = 0xff;
while (1) {
PORTB = 0xff;
}
}
程序運行結果:LED燈不亮。
把PORTB = 0xff;改成PORTB = 0x00;
再編譯,燒寫,LED燈仍然不亮!!!
這TMD還真是AVR_frighter的問題!
|
|
一派護法 十九級 |
現在,馬上用Linux下的avrdude重新燒寫程序:
[octopus@pc3 ATTiny13]$ make run
avr-gcc -mmcu=attiny13 -Wall -Os tiny.c -o tiny.o
tiny.c:5:6: warning: return type of 'main' is not 'int' [-Wmain]
void main()
^
avr-objcopy -j .text -j .data -O ihex tiny.o tiny.hex
sudo avrdude -p t13 -c usbasp -e -U flash:w:tiny.hex
[sudo] password for octopus:
avrdude: warning: cannot set sck period. please check for usbasp firmware update.
avrdude: AVR device initialized and ready to accept instructions
Reading | ################################################## | 100% 0.02s
avrdude: Device signature = 0x1e9007
avrdude: erasing chip
avrdude: warning: cannot set sck period. please check for usbasp firmware update.
avrdude: reading input file "tiny.hex"
avrdude: input file tiny.hex auto detected as Intel Hex
avrdude: writing flash (86 bytes):
Writing | ################################################## | 100% 0.76s
avrdude: 86 bytes of flash written
avrdude: verifying flash memory against tiny.hex:
avrdude: load data flash data from input file tiny.hex:
avrdude: input file tiny.hex auto detected as Intel Hex
avrdude: input file tiny.hex contains 86 bytes
avrdude: reading on-chip flash data:
Reading | ################################################## | 100% 0.58s
avrdude: verifying ...
avrdude: 86 bytes of flash verified
avrdude: safemode: Fuses OK (E:FF, H:FF, L:2A)
avrdude done. Thank you.
[octopus@pc3 ATTiny13]$
程序正常運行!
(那個int main()寫錯了暫時不管了。。。)
|
|
一派護法 十九級 |
筆者又把ICC AVR生成的hex文件複製到Linux下用avrdude燒寫,LED亮了!程序正常運行。
|
|
一派護法 十九級 |
所以,ATtiny13A芯片本身沒有什麼問題。我的電路也沒有問題。問題主要出在AVR_frighter上,都怪它!以後不要再用AVR_frighter燒寫ATtiny13的程序了!
AVR_frighter燒寫gccavr和ICC AVR的程序都無法正常運行。
而Linux下的avrdude燒寫gccavr和ICC AVR的程序都可以正常運行。
至於Windows平台下的WinAVR,因為用的編譯器和linux下是相同的,所以我估計燒寫後也可以正常運行。不過我還沒有測試額。。。。
|
|
一派護法 十九級 |
筆者又把74HC595取下來了。然後再用AVR_frighter燒寫ICCAVR程序,LED不亮。再用avrdude燒寫同一個hex文件(ICCAVR生成),LED亮。這證明:
不是74HC595芯片影響了AVR_frighter燒寫程序。是AVR_frighter壓根就沒法正確地燒寫ATtiny13芯片!
|
|
一派護法 十九級 |
另外,4~13樓的程序中所有的int main()都改為void main(void),筆者疏忽了,不過也不影響程序的編寫。
|
|
一派護法 十九級 |
  時間過了一年半,問題終於解決了。。。。
|
|
一派護法 十九級 |
現在事情已經徹底水落石出了。是AVR_frighter本身的問題導致的,它根本無法燒寫程序到ATtiny13。至於開頭第二次用avrdude燒寫程序到芯片後LED燈還不亮的問題,是因為Makefile導致的。是# make run 下面那一行寫錯了,導致程序文件修改後執行make run時卻沒有重新編譯就直接燒寫到了芯片而出錯。avrdude是可以正常燒寫ATtiny13的。
|
|
一派護法 十九級 |
avrdude燒寫程序後也可以在控制台看到熔絲位的值:
avrdude: safemode: Fuses OK (E:FF, H:FF, L:2A)
avrdude done. Thank you.
[octopus@pc3 ATTiny13]$
|


