 一派護法 十九級 |
【程式】
#include <stm32f10x.h>
#define RS_0 GPIO_WriteBit(GPIOB, GPIO_Pin_1, Bit_RESET) // 寄存器选择位
#define RS_1 GPIO_WriteBit(GPIOB, GPIO_Pin_1, Bit_SET)
#define RW_0 GPIO_WriteBit(GPIOB, GPIO_Pin_2, Bit_RESET) // 读写选择位
#define RW_1 GPIO_WriteBit(GPIOB, GPIO_Pin_2, Bit_SET)
#define E_0 GPIO_WriteBit(GPIOB, GPIO_Pin_0, Bit_RESET) // 使能信号位
#define E_1 GPIO_WriteBit(GPIOB, GPIO_Pin_0, Bit_SET)
#define BF GPIO_ReadInputDataBit(GPIOB, GPIO_Pin_15) // 忙碌标志位
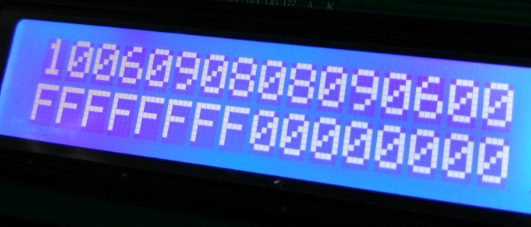
unsigned char userchar[] = {0x10, 0x06, 0x09, 0x08, 0x08, 0x09, 0x06, 0x00};
unsigned char userchar2[] = {0xff, 0xff, 0xff, 0xff, 0x00, 0x00, 0x00, 0x00};
extern uint32_t systick_counter; // 定时器中断中的计时变量
// 延时n毫秒
void delay(uint32_t nms)
{
systick_counter = nms;
while (systick_counter > 0);
}
// 把数据端口改为读模式
void LCDBeginRead(void)
{
GPIO_InitTypeDef init;
init.GPIO_Mode = GPIO_Mode_IPU;
init.GPIO_Pin = 0xff00;
GPIO_Init(GPIOB, &init);
}
// 把数据端口改为写模式
void LCDBeginWrite(void)
{
GPIO_InitTypeDef init;
init.GPIO_Mode = GPIO_Mode_Out_PP;
init.GPIO_Speed = GPIO_Speed_50MHz;
init.GPIO_Pin = 0xff00;
GPIO_Init(GPIOB, &init);
}
// 判断液晶模块的忙碌状态
uint8_t LCDBusyTest(void)
{
uint8_t result;
LCDBeginRead();
RS_0;
RW_1;
E_1;
__nop();
__nop();
__nop();
result = BF;
E_0;
return result;
}
// 获取当前光标位置
// 虽然时序和检测忙信号完全相同,但是也要检测忙信号
// 避免读到错误的数据
uint8_t LCDGetPos(void)
{
uint8_t pos;
while (LCDBusyTest());
delay(1);
E_1;
__nop();
__nop();
__nop();
pos = (GPIO_ReadInputData(GPIOB) >> 8) & 0x7f;
E_0;
return pos;
}
// 将模式设置指令或显示地址写入液晶模块
void LCDWriteCmd(uint8_t cmd)
{
while (LCDBusyTest()); // 如果忙就等待
LCDBeginWrite();
RS_0;
RW_0;
E_0;
__nop();
__nop();
GPIOB->ODR = (GPIOB->ODR & 0xff) + (cmd << 8);
__nop();
__nop();
__nop();
__nop();
E_1;
__nop();
__nop();
__nop();
__nop();
E_0;
}
// 设置光标位置(行, 列)
void LCDSetPos(uint8_t row, uint8_t col)
{
LCDWriteCmd(0x80 + row * 0x40 + col);
}
// 读取一个字符
char LCDReadData(void)
{
char data;
while (LCDBusyTest());
LCDBeginRead();
RS_1;
RW_1;
E_1;
__nop();
__nop();
__nop();
data = GPIO_ReadInputData(GPIOB) >> 8 & 0xff;
E_0;
return data;
}
// 读取指定长度的字符串
void LCDReadString(char *p, int n)
{
while (n--)
*p++ = LCDReadData();
*p = '\0';
}
// 写入字符
void LCDWriteData(char ch)
{
while (LCDBusyTest());
LCDBeginWrite();
RS_1;
RW_0;
E_0;
GPIOB->ODR = (GPIOB->ODR & 0xff) + (ch << 8);
__nop();
__nop();
__nop();
__nop();
E_1;
__nop();
__nop();
__nop();
__nop();
E_0;
}
// 写入字符串
void LCDWriteString(char *s)
{
while (*s != '\0')
{
LCDWriteData(*s);
s++;
}
}
// 清屏, 且光标回到(0, 0), 左上角坐标也回到(0, 0)
void LCDClear(void)
{
LCDWriteCmd(0x01);
}
// 初始化液晶
void LCDInit(void)
{
uint8_t i = 3;
delay(15); // 延时15ms,首次写指令时应给LCD一段较长的反应时间
while (i--) // 必须写入3次
{
LCDWriteCmd(0x38); // 显示模式设置:16×2显示,5×7点阵,8位数据接口
delay(5);
}
LCDWriteCmd(0x0c); // 显示模式设置:显示开,无光标
delay(5);
LCDWriteCmd(0x06); // 显示模式设置:光标右移,整屏显示不移
delay(5);
LCDClear();
delay(5);
}
// 添加自定义字符
void LCDAddCharacter(uint8_t id, unsigned char table[])
{
uint8_t i;
LCDWriteCmd(0x40 + id * 8);
for (i = 0; i < 8; i++)
LCDWriteData(table[i]);
}
// 显示两位十六进制数
void showhex(uint8_t n)
{
char *list = "0123456789ABCDEF";
LCDWriteData(list[n / 16]);
LCDWriteData(list[n % 16]);
}
int main(void)
{
char buf[10];
GPIO_InitTypeDef init;
uint8_t i, j, k;
// 初始化整个PB口
RCC_APB2PeriphClockCmd(RCC_APB2Periph_GPIOB, ENABLE);
init.GPIO_Mode = GPIO_Mode_Out_PP;
init.GPIO_Pin = GPIO_Pin_All;
init.GPIO_Speed = GPIO_Speed_50MHz;
GPIO_Init(GPIOB, &init);
// 初始化定时器, 每1ms触发一次中断, 供delay函数使用
SysTick_Config(SystemCoreClock / 1000);
LCDInit();
LCDSetPos(0, 1);
LCDWriteString("Arslanbar");
LCDSetPos(1, 2);
LCDWriteString("Welcome");
// 显示自定义字符
LCDAddCharacter(0, userchar);
LCDAddCharacter(1, userchar2);
LCDSetPos(0, 11);
LCDWriteData(0);
LCDWriteData(1);
// 读出自定义字符
delay(3000);
LCDWriteCmd(0x40); // 第一个自定义字符的地址
LCDReadString(buf, 16);
LCDClear();
for (i = 0; i < 16; i++)
{
if (i == 8)
LCDSetPos(1, 0);
showhex(buf[i]);
}
delay(3000);
LCDClear();
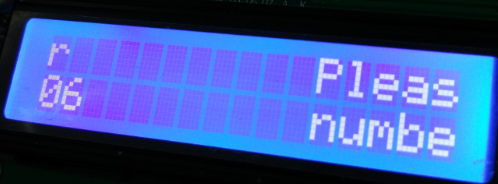
LCDSetPos(0, 16);
LCDWriteString("Please input the "); // 不支持自动换行...
LCDSetPos(1, 16);
LCDWriteString("number of rows:");
LCDSetPos(1, 16);
LCDReadString(buf, 6); // 读取写在屏幕上的字符串
LCDSetPos(0, 0);
LCDWriteString(buf); // 显示读取的字符串
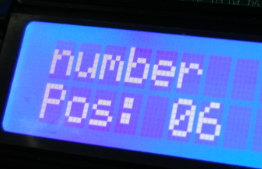
i = LCDGetPos(); // 获取现在的光标位置
LCDSetPos(1, 0);
LCDWriteString("Pos: ");
showhex(i);
delay(5000);
for (i = 0; i < 16; i++)
{
LCDWriteCmd(0x18); // 整屏左移
delay(500);
}
// 左移完毕后,液晶左上角坐标滚动到了0x10处
// 清屏后,液晶左上角坐标又会回到0x00处
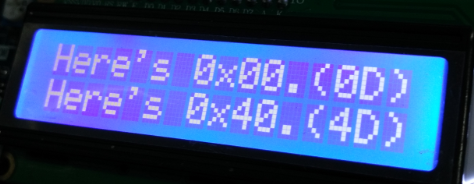
LCDClear();
LCDWriteString("Here's 0x00.(");
showhex(LCDGetPos());
LCDWriteData(')');
LCDSetPos(1, 0);
LCDWriteString("Here's 0x40.(");
showhex(LCDGetPos());
LCDWriteData(')');
delay(5000);
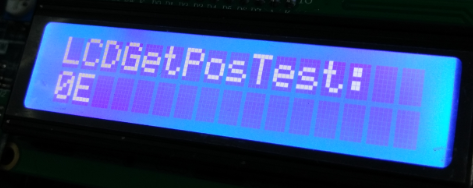
LCDClear();
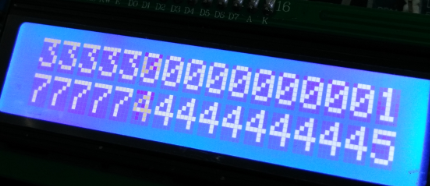
LCDWriteString("LCDGetPosTest:");
for (i = 0; i < 2; i++)
{
for (j = 0; j < 40; j++) // 每行只有40个空间*而非0x40个, 切记!
{
LCDSetPos(i, j);
k = LCDGetPos();
LCDSetPos(1, 0);
showhex(k);
delay(500);
}
}
// 1602液晶的只能保存80个显示字符
// 每行各40个字符
// 因此0x28~0x39和0x68~0x79这段地址是不能用的
LCDSetPos(0, 0);
LCDWriteString("0000000000111111111122222222223333333333");
LCDWriteString("4444444444555555555566666666667777777777");
while (1)
{
delay(500);
LCDWriteCmd(0x1c); // 整屏右移
}
}
|